Note
Go to the end to download the full example code.
Example demonstrating STAR + DSS#
This example shows how one can effectively combine STAR and DSS to recover signal components which would not have been discoverable with either these two techniques alone, due to the presence of strong artifacts.
The key didactic point is to compare DSS alone versus STAR followed by DSS, and verify that STAR + DSS recovers a component that is closer to the known target signal.
This example replicates figure 1 in [1].
References#
import matplotlib.pyplot as plt
import numpy as np
from scipy.optimize import leastsq

from meegkit import dss, star
from meegkit.utils import demean, normcol, tscov

# import config  # noqa

rng = np.random.default_rng(9)
Create simulated data#
Simulated data consist of N channels, 1 sinusoidal target, N-3 noise sources, with temporally local artifacts on each channel.
# Source
n_chans, n_samples = 10, 1000
f = 2
target = np.sin(np.arange(n_samples) / n_samples * 2 * np.pi * f)
target = target[:, np.newaxis]
noise = rng.standard_normal((n_samples, n_chans - 3))

# Create artifact signal
SNR = np.sqrt(1)
x0 = normcol(np.dot(noise, rng.standard_normal((noise.shape[1], n_chans)))) + \
    SNR * target * rng.standard_normal((1, n_chans))
x0 = demean(x0)
artifact = np.zeros(x0.shape)
for k in np.arange(n_chans):
    artifact[k * 100 + np.arange(20), k] = 1
x = x0 + 10 * artifact


def _sine_fit(x):
    """Fit a sinusoidal trend."""
    guess_mean = np.mean(x)
    guess_std = np.std(x)
    guess_phase = 0
    t = np.linspace(0, 4 * np.pi, x.shape[0])

    # Optimization function, in this case, we want to minimize the difference
    # between the actual data and our "guessed" parameters
    def func(y):
        return np.mean(x - (y[0] * np.sin(t + y[1]) + y[2])[:, None], 1)

    est_std, est_phase, est_mean = leastsq(
        func, [guess_std, guess_phase, guess_mean])[0]
    data_fit = est_std * np.sin(t + est_phase) + est_mean
    return np.tile(data_fit, (x.shape[1], 1)).T
1) Apply STAR#
y, w, _ = star.star(x, 2)
proportion artifact free: 0.70
proportion artifact free: 0.70
proportion artifact free: 0.70
depth: 1
fixed channels: 10
fixed samples: 299
ratio: 1.01
power ratio: 0.40
2) Apply DSS on raw data#
DSS alone uses a bias covariance built from the signal minus a fitted sinusoidal trend. This encourages components that resemble the oscillatory target, but the strong sparse artifacts still dominate the decomposition.
c0, _ = tscov(x)
c1, _ = tscov(x - _sine_fit(x))
[todss, _, pwr0, pwr1] = dss.dss0(c0, c1)
z1 = normcol(np.dot(x, todss))
3) Apply DSS on STAR-ed data#
After STAR, the same DSS bias becomes much more informative because the large transient artifacts have already been suppressed.
c0, _ = tscov(y)
c1, _ = tscov(y - _sine_fit(y))
[todss, _, pwr0, pwr1] = dss.dss0(c0, c1)
z2 = normcol(np.dot(y, todss))

# Compare how well the best recovered component matches the known target.
r_dss = np.corrcoef(z1[:, 0], target[:, 0])[0, 1]
r_star_dss = np.corrcoef(z2[:, 0], target[:, 0])[0, 1]
Plots#
The key comparison is not just visual denoising, but whether the recovered component aligns more strongly with the known target after STAR preprocessing.
f, (ax0, ax1, ax2, ax3) = plt.subplots(4, 1, figsize=(7, 9))
ax0.plot(target, lw=.5)
ax0.set_title("Target")

ax1.plot(x, lw=.5)
ax1.set_title(f"Signal + Artifacts (SNR = {SNR})")

ax2.plot(z1[:, 0], lw=.5, label="Best DSS component")
ax2.set_title(f"DSS (corr with target = {r_dss:.2f})")
ax2.legend(loc="lower right")
ax2.set_ylabel("Amplitude")

ax3.plot(z2[:, 0], lw=.5, label="Best DSS component")
ax3.set_title(f"STAR + DSS (corr with target = {r_star_dss:.2f})")
ax3.legend(loc="lower right")
ax3.set_ylabel("Amplitude")
ax3.set_xlabel("Samples")

f.set_tight_layout(True)
print(f"Correlation with target, DSS only:   {r_dss:.3f}")
print(f"Correlation with target, STAR + DSS: {r_star_dss:.3f}")
plt.show()
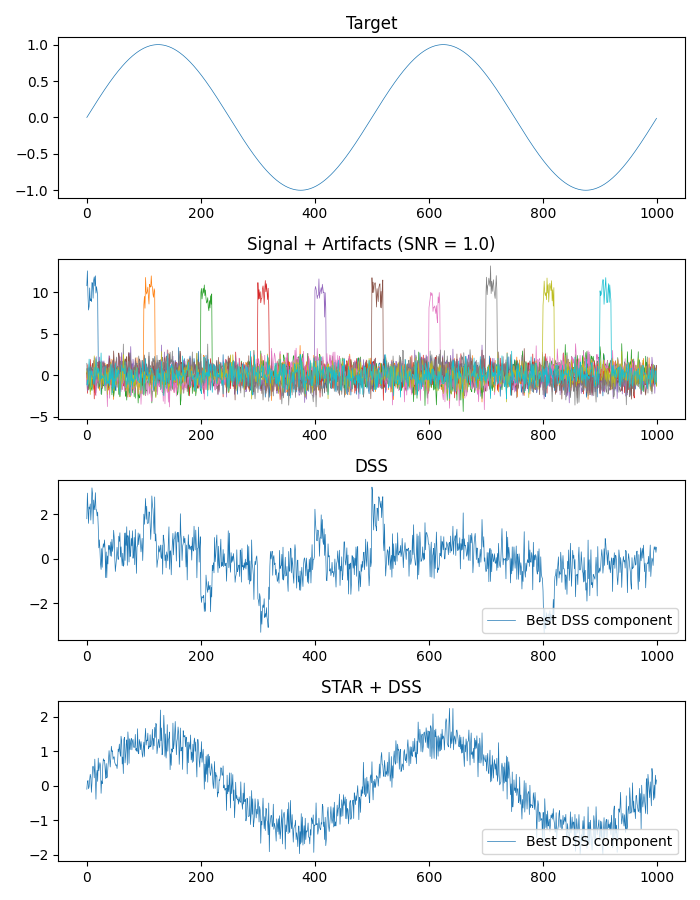
Correlation with target, DSS only:   0.417
Correlation with target, STAR + DSS: 0.949
Total running time of the script: (0 minutes 0.424 seconds)